
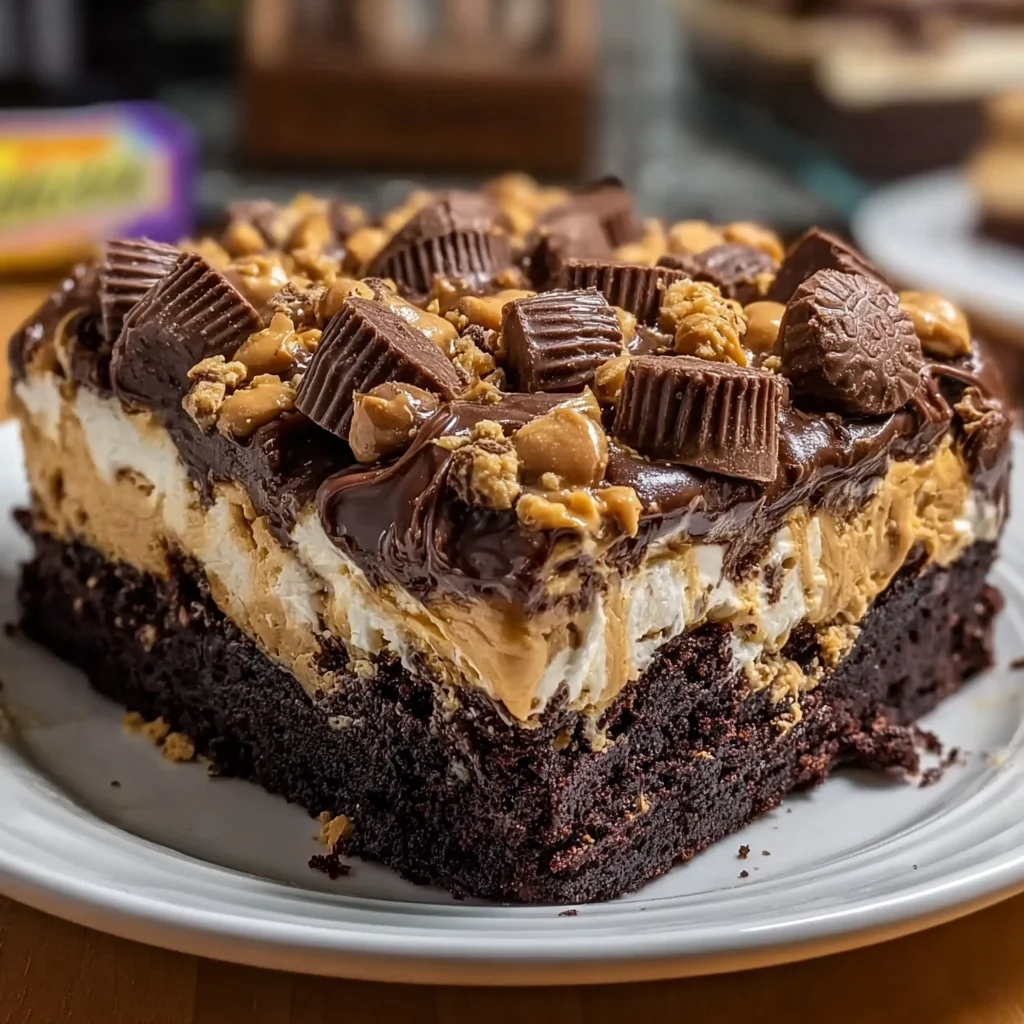
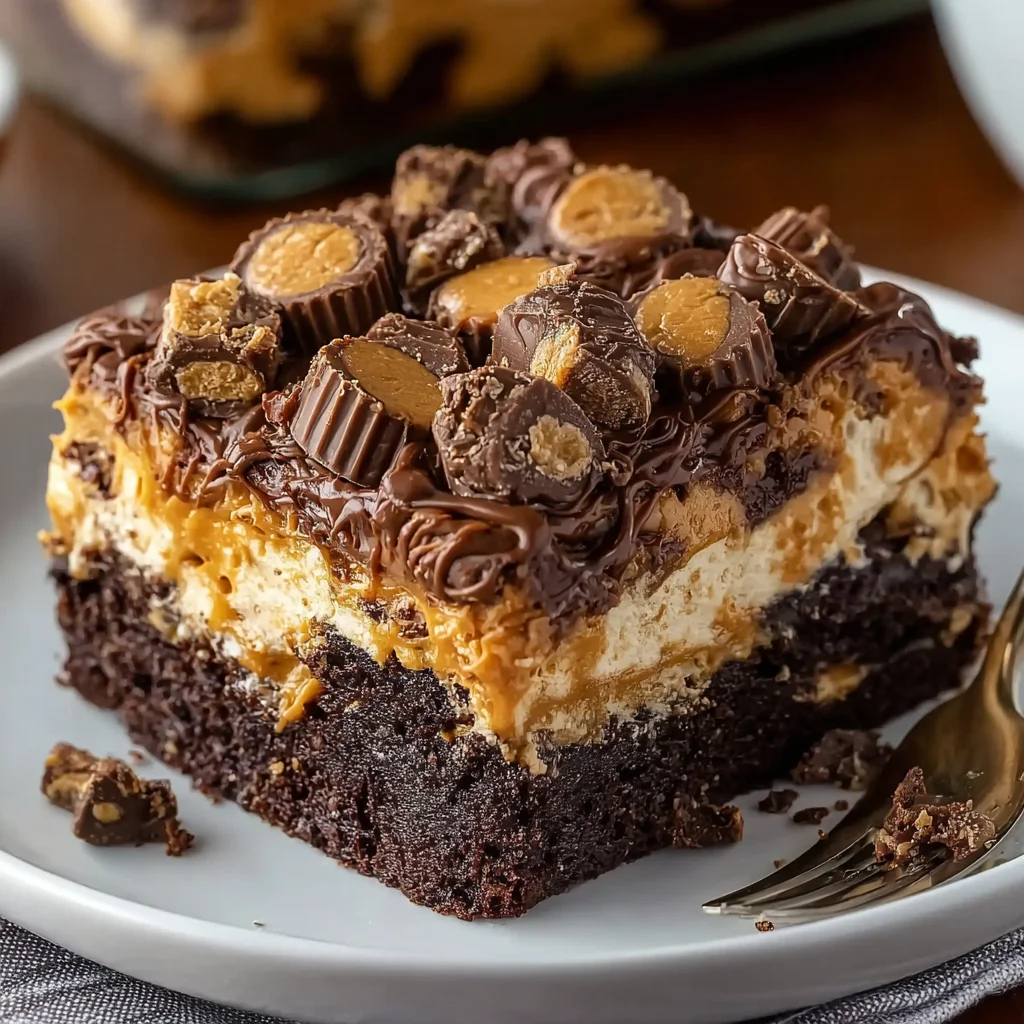
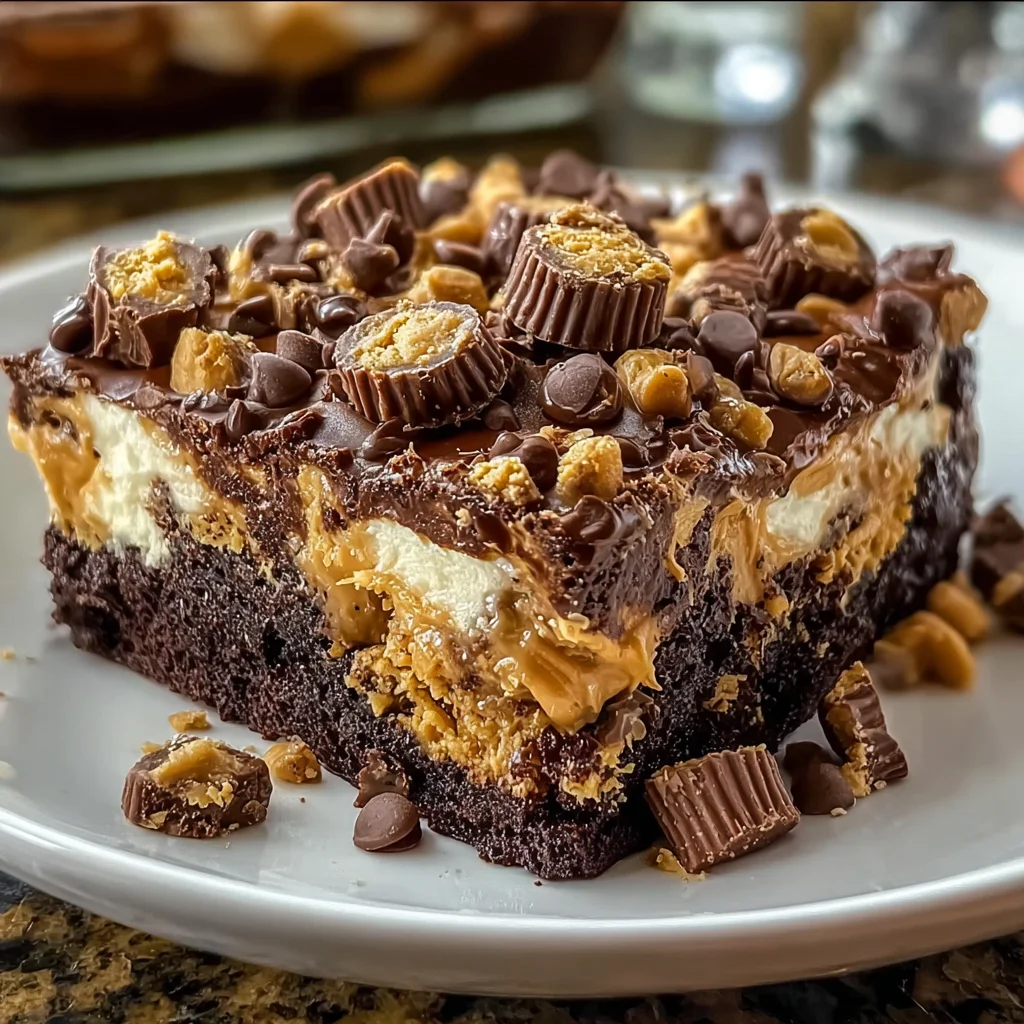
Introduction to Reese’s Peanut Butter Earthquake Cake
As a mom always on the go, finding the perfect dessert can feel like searching for a unicorn. That’s why I’m excited to share my recipe for Reese’s Peanut Butter Earthquake Cake! This incredible cake combines rich chocolate with creamy peanut butter and delightful chunks of Reese’s. It’s a blissful answer to those hectic weekdays when you crave something sweet yet simple. If you’ve ever wanted an indulgent treat that will wow your family without taking all day, you’re in the right place. Let’s dive into this deliciously easy recipe!
Why You’ll Love This Reese’s Peanut Butter Earthquake Cake
This Reese’s Peanut Butter Earthquake Cake is the ultimate time-saver in your baking repertoire. It requires just a handful of ingredients and minimal prep work, making it a go-to for those busy days. The flavor is irresistible, combining chocolate and peanut butter in every bite. Plus, it’s sure to impress when friends or family drop by unexpectedly. Enjoy a dessert that brings smiles all around with very little fuss!
Ingredients for Reese’s Peanut Butter Earthquake Cake
Gathering the ingredients for this delightful cake is a breeze. Here’s what you’ll need:
- Chocolate cake mix: The star of this cake! It provides the rich chocolate base.
- Water: It helps to bring your cake mix to life; just enough moisture!
- Vegetable oil: This will keep the cake moist and delicious without overpowering flavors.
- Large eggs: Essential for binding and adding richness to the cake.
- Creamy peanut butter: Oh, the heavenly swirl! It adds creaminess and a delightful peanut flavor.
- Cream cheese: This softens the peanut butter mixture and adds a tangy sweetness.
- Unsalted butter: Melted for a smooth and flavorful peanut butter swirl.
- Powdered sugar: This sweetens the peanut butter mixture, making it irresistibly frosting-like.
- Vanilla extract: A splash of vanilla enhances all the flavors for a richer taste.
- Reese’s Peanut Butter Cups: For those heavenly chunks that truly make this cake a masterpiece!
For exact measurements, check the bottom of the article where you can find them available for printing. Feel free to get creative: if chocolate isn’t your thing, dark chocolate cake mix is a rich alternative, or try natural peanut butter for a lighter flavor. And if you’re feeling adventurous, swap in some caramel sauce or add chopped nuts for extra crunch!
How to Make Reese’s Peanut Butter Earthquake Cake
Ready to create your own slice of heaven? Making this Reese’s Peanut Butter Earthquake Cake is easier than you think. Just follow these simple steps, and you’ll be serving up a delightful dessert in no time!
Step 1: Preheat and Prepare
First things first, preheat your oven to 350°F. This step is key for a perfectly baked cake!
While the oven warms up, grab a 9×13-inch baking dish and grease it well. I usually use non-stick spray, but butter works just as well. This keeps the cake from sticking and ensures a beautiful, clean slice.
Step 2: Prepare the Cake Batter
In a large mixing bowl, combine the chocolate cake mix with water, vegetable oil, and the eggs. I find that using an electric mixer helps to get everything nice and smooth, but a whisk does the trick too—just add a little elbow grease!
Once everything is well blended, pour the chocolaty batter into the prepared baking dish. Smooth it out evenly, so it bakes wonderfully.
Step 3: Create the Peanut Butter Mixture
In another bowl, it’s time to make that heavenly peanut butter swirl. Combine creamy peanut butter, softened cream cheese, melted butter, powdered sugar, and a splash of vanilla extract. Mix until it’s silky smooth.
This is the moment when the kitchen starts to smell divine! Don’t shy away from tasting it; I mean, can you blame me?
Step 4: Combine and Swirl
Now the fun part! Drop spoonfuls of that luscious peanut butter mixture over the chocolate batter. Here’s where the magic happens: take a knife and gently swirl the peanut butter into the cake batter.
Be careful not to mix it all together too much. You want those delicious pockets of peanut butter to remain—you’ll be rewarded with bursts of flavor in each bite!
Step 5: Add Reese’s Peanut Butter Cups
To make this cake irresistible, sprinkle the chopped Reese’s Peanut Butter Cups over the top of the batter. Yes, please! More peanut butter goodness!
Feel free to be a little generous—it’s hard to have too much chocolate and peanut butter, right?
Step 6: Bake the Cake
Slide the baking dish into your preheated oven and bake for 35-40 minutes. The cake is done when a toothpick inserted in the center comes out mostly clean.
Once it’s baked, remove the cake from the oven and let it cool slightly before serving. It’s fabulous warm, but it also works beautifully at room temperature.
Tips for Success
- Make sure your ingredients are at room temperature for a smoother batter.
- Don’t overmix the cake batter; just blend until combined to keep it light and fluffy.
- For an easy cleanup, line your baking dish with parchment paper before greasing it.
- Let the cake cool slightly in the pan for easier slicing.
- Store leftovers in an airtight container at room temperature for up to 3 days.
Practical Tips
Equipment Needed
- 9×13-inch baking dish: A standard size that’s perfect for this cake; you can also use a slightly larger dish if needed.
- Mixing bowls: A couple of medium to large bowls will do for mixing the batter and peanut butter swirl.
- Electric mixer or whisk: An electric mixer makes it easier, but a whisk works well for mixing.
- Rubber spatula: Great for scraping down sides of bowls and getting every last bit of batter.
- Knife: Essential for swirling and cutting your perfect cake slices!
Variations
- Chocolate Chip Delight: Add a cup of chocolate chips to the batter for an extra chocolatey experience!
- Nutty Swirl: Incorporate chopped nuts, like walnuts or pecans, into the peanut butter mixture for added crunch.
- Gluten-Free Option: Use a gluten-free chocolate cake mix to make this dessert suitable for gluten-sensitive friends.
- Salted Caramel Twist: Drizzle salted caramel sauce over the top just before serving for a decadent touch.
- Peanut Butter Alternatives: Swap the creamy peanut butter for almond or cashew butter to give a new taste to the cake.
Serving Suggestions for Reese’s Peanut Butter Earthquake Cake
- Vanilla Ice Cream: Serve warm slices with a generous scoop of vanilla ice cream for a delightful contrast.
- Coffee: Pair with a cup of fresh-brewed coffee or espresso for a rich afternoon treat.
- Chocolate Sauce: Drizzle chocolate sauce over each slice for an extra dose of decadence.
- Presentation: Garnish with whipped cream and a sprinkle of chopped Reese’s for an eye-catching finish.
FAQs about Reese’s Peanut Butter Earthquake Cake
Can I use a different cake mix for this recipe?
Absolutely! While chocolate cake mix is a classic choice, you can experiment with dark chocolate or even yellow cake mix for a lighter flavor. Each variation brings a unique twist to your Reese’s Peanut Butter Earthquake Cake!
How do I know when the cake is done?
The cake is ready when a toothpick inserted into the center comes out mostly clean, with a few moist crumbs attached. It’s perfectly fine if it has slight moisture, as it will continue to bake while cooling.
Can I make this cake ahead of time?
Yes! This cake is great for making ahead. Just bake it, and once cooled, you can store it in an airtight container. It’s delicious for up to three days, though I doubt it will last that long!
What if I have leftover peanut butter mixture?
Well, you could always make mini peanut butter cups! Just spoon the leftover mixture into candy molds or drop dollops on parchment paper and freeze. Treat yourself—because you deserve it!
Can I freeze Reese’s Peanut Butter Earthquake Cake?
Definitely! You can freeze slices wrapped tightly in plastic wrap, then in aluminum foil. Just thaw overnight in the fridge when you’re ready to indulge again!
Final Thoughts
Cooking has always been my love language, especially when I can share something as joyful as Reese’s Peanut Butter Earthquake Cake. Each bite offers a delightful mix of chocolate and peanut butter that truly warms the soul. This cake isn’t just a dessert; it’s a reason to gather friends and family, to celebrate life’s little moments. With its simple preparation and deliciously sweet results, you’ll find yourself turning to this recipe time and time again. Enjoy every slice and let the smiles spread, because nothing brings people together quite like a slice of this heavenly cake!
Print
Reese’s Peanut Butter Earthquake Cake that Will Delight You!
- Total Time: 55 minutes
- Yield: 12 servings 1x
- Diet: Vegetarian
Description
A delicious chocolate cake with a rich peanut butter swirl and chunks of Reese’s Peanut Butter Cups that creates a delightful and indulgent dessert.
Ingredients
- 1 box chocolate cake mix
- 1 cup water
- 1/2 cup vegetable oil
- 3 large eggs
- 1 cup creamy peanut butter
- 8 oz cream cheese, softened
- 1/2 cup unsalted butter, melted
- 4 cups powdered sugar
- 1 tsp vanilla extract
- 1 cup Reese’s Peanut Butter Cups, chopped
Instructions
- Preheat oven to 350°F (175°C). Grease a 9×13-inch baking dish.
- In a large bowl, mix the chocolate cake mix, water, vegetable oil, and eggs until well combined. Pour the batter into the prepared baking dish.
- In a separate bowl, combine the peanut butter, cream cheese, melted butter, powdered sugar, and vanilla extract. Mix until smooth.
- Drop spoonfuls of the peanut butter mixture over the cake batter. Use a knife to swirl the peanut butter mixture into the batter.
- Sprinkle the chopped Reese’s Peanut Butter Cups evenly over the top.
- Bake for 35-40 minutes, or until a toothpick inserted into the center comes out mostly clean.
- Allow the cake to cool slightly before serving. Enjoy warm or at room temperature.
Notes
- For a richer flavor, consider using dark chocolate cake mix.
- Serve with a scoop of vanilla ice cream for an extra treat.
- Store leftovers in an airtight container at room temperature for up to 3 days.
- Prep Time: 15 minutes
- Cook Time: 40 minutes
- Category: Dessert
- Method: Bake
- Cuisine: American
Nutrition
- Serving Size: 1 slice
- Calories: 350
- Sugar: 28g
- Sodium: 350mg
- Fat: 20g
- Saturated Fat: 8g
- Unsaturated Fat: 10g
- Trans Fat: 0g
- Carbohydrates: 34g
- Fiber: 1g
- Protein: 5g
- Cholesterol: 50mg
Keywords: Reese’s, Peanut Butter, Cake, Earthquake Cake, Chocolate Cake, Dessert