
Introduction to Pickle Fix Holiday Cheese Ball
As the holiday season approaches, I’m constantly on the lookout for delightful recipes that can cater to my family and friends. That’s when I discovered the Pickle Fix Holiday Cheese Ball. This festive treat is more than just a cheese ball; it’s a gathering of flavors that brings warmth and cheer to any table. Perfect for busy moms like me, this dish is easy to whip up and sure to impress. Just imagine the smiles as this creamy, pickle-infused delight takes center stage at your holiday gatherings. Trust me, your loved ones will be begging for more!
Why You’ll Love This Pickle Fix Holiday Cheese Ball
This Pickle Fix Holiday Cheese Ball is a lifesaver for any busy mom or professional! It’s quick to prepare, taking just a mere 15 minutes of your time. The combination of rich cream cheese and sharp cheddar delivers a taste explosion that everyone raves about. Plus, it can be made ahead, relieving stress and making holiday gatherings more enjoyable. With this show-stopping appetizer, you’ll create memorable moments with loved ones without breaking a sweat!
Ingredients for Pickle Fix Holiday Cheese Ball
Gathering the right ingredients is key to creating this delicious Pickle Fix Holiday Cheese Ball. Below, I’ve listed what you’ll need to whip up this festive appetizer, along with some tips and options for substitutions.
- Cream Cheese: This forms the base of the cheese ball, providing creaminess. Make sure it’s softened for easy mixing.
- Sharp Cheddar Cheese: The star of this dish! Its bold flavor balances nicely with the cream cheese.
- Sour Cream: Adds tanginess and helps create a smooth texture.
- Dill Pickles: Finely chopped, these bring the “pickle fix” to life! They contribute crunch and flavor. You can use spears or slices, just chop them well.
- Green Onions: These add a fresh crunch and mild onion taste. If you’re not a fan, you can sub with chives.
- Fresh Dill: This herb enhances the pickle flavor beautifully. Dried dill can be used as a substitute, but fresh is preferred.
- Worcestershire Sauce: Just a touch adds depth and umami to the cheese ball.
- Garlic Powder: A little sprinkle for that wonderful garlic flavor without overpowering the dish.
- Onion Powder: Complements the fresh onion without being too strong.
- Black Pepper: Freshly ground for a little kick.
- Pecans: Finely chopped for the exterior, they bring a lovely crunch. You can swap these for walnuts if preferred.
- Fresh Parsley: Adds a pop of color and freshness to the coating. It’s optional but highly recommended.
- Additional Dill Pickles: For the coating mix, they provide extra zing and flavor. Feel free to add more if you love pickles!
For measurements, just scroll to the end of the article where everything is laid out for easy printing!
How to Make Pickle Fix Holiday Cheese Ball
Now that you’ve gathered your ingredients, it’s time to dive into the fun part—making this incredible Pickle Fix Holiday Cheese Ball! Follow my easy steps, and let’s create a festive masterpiece that’ll have everyone talking.
Step 1: Prepare the Base
Start by combining the softened cream cheese, shredded sharp cheddar, and sour cream in a large mixing bowl. Grab your hand mixer or a sturdy spatula and beat the mixture until it’s smooth and creamy. Think of it as a fluffy cloud of deliciousness, just waiting to be transformed!
Step 2: Mix in Flavorings
Next, gently fold in the finely chopped dill pickles, green onions, fresh dill, Worcestershire sauce, garlic powder, onion powder, and black pepper. This combination is like a flavor party in your bowl! Make sure everything is evenly blended. The colors and smells will make your kitchen feel festive!
Step 3: Shape the Cheese Ball
Now it’s time to shape this beauty! Transfer your blended mixture onto a large sheet of plastic wrap. Using the wrap, form the mixture into a compact ball. It’s like giving your cheese ball a cozy little blanket before it chills out. Just make sure you press it firmly, and it will hold its shape.
Step 4: Chill the Cheese Ball
Pop the wrapped cheese ball into the refrigerator for at least 1 hour, or up to 24 hours if you’re preparing ahead. The chilling process allows the flavors to meld and helps firm up the mixture. It’s like a little vacation for your cheese ball, making it ready for its big debut!
Step 5: Prepare the Coating
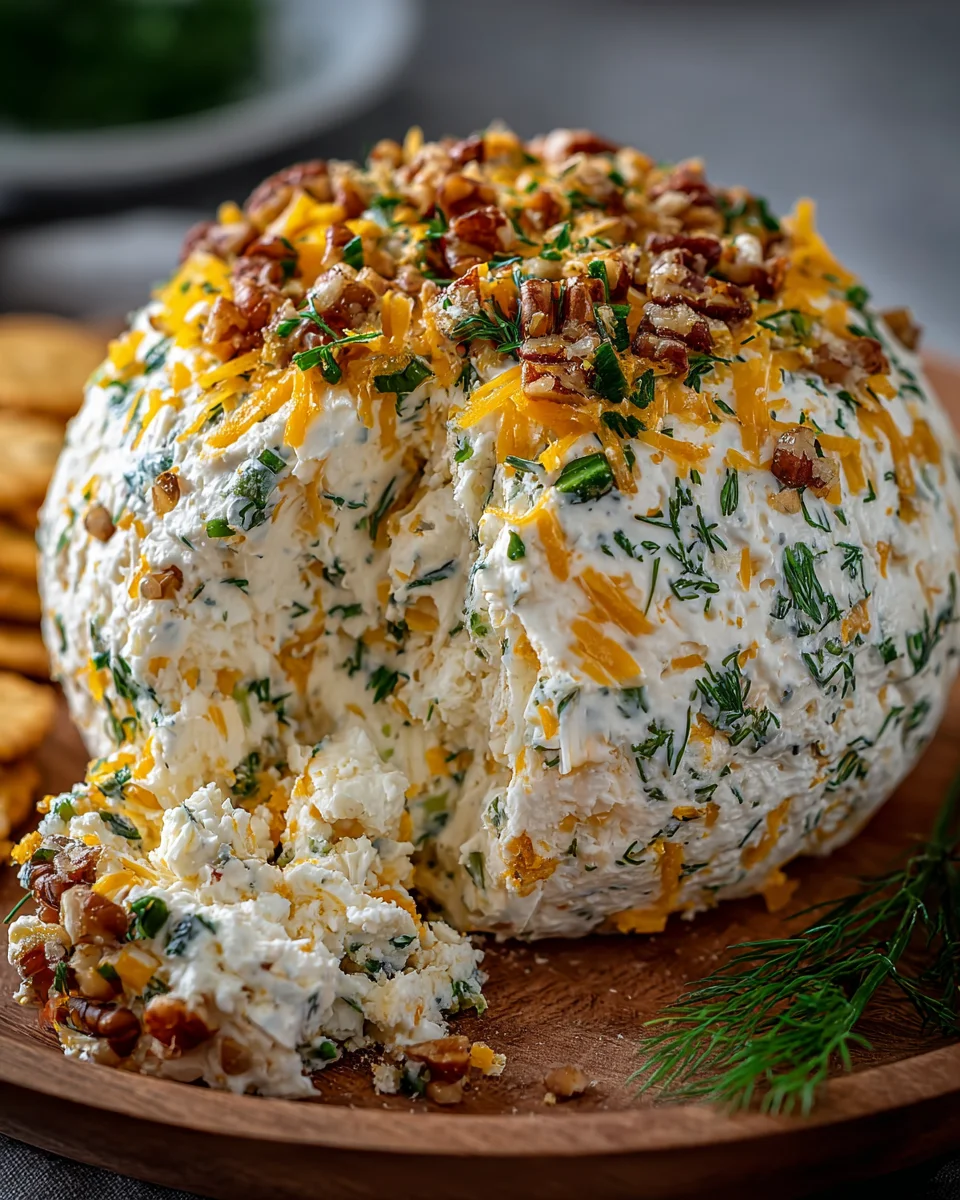
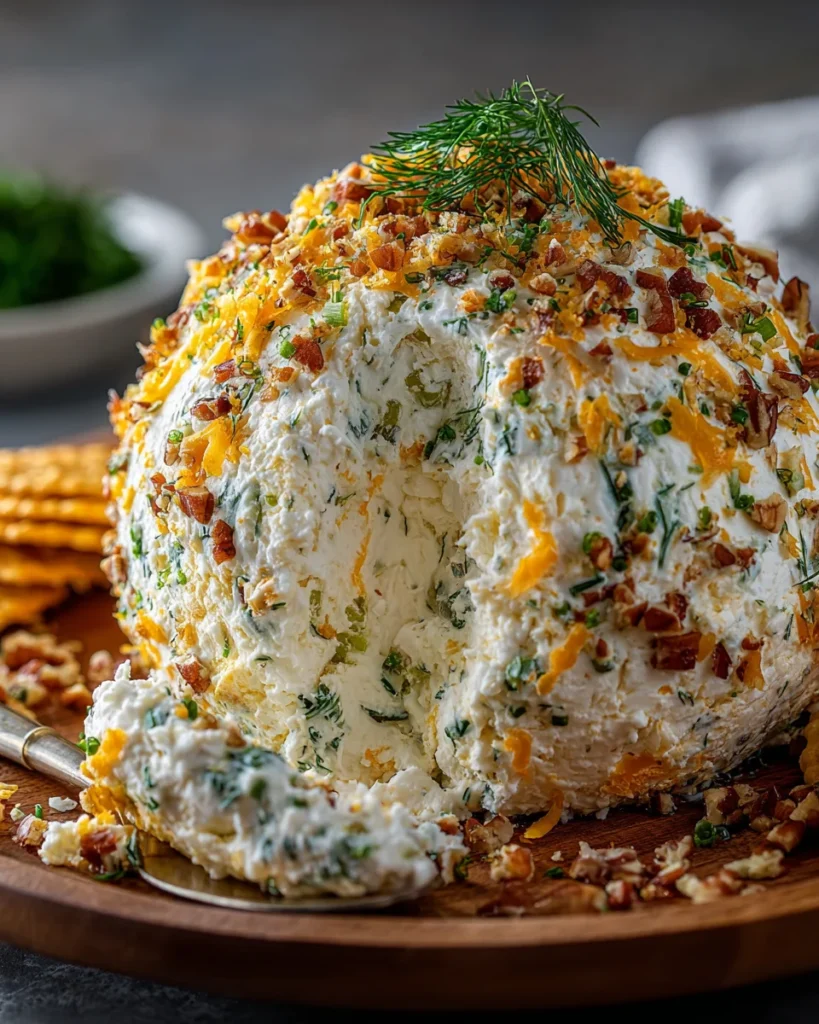
While your cheese ball is chilling, let’s prepare the coating! In a shallow dish, mix together chopped pecans, fresh parsley, and additional chopped dill pickles. This coating isn’t just for looks; it adds an extra crunch and burst of flavor to your cheese ball. It’s going to be irresistible!
Step 6: Finish the Cheese Ball
Once your cheese ball is chilled and firm, remove it from the plastic wrap. Gently roll it in the prepared coating mixture. Press lightly to ensure an even layer on all sides. You want every bite packed with flavor and crunch. Just imagine how impressive this will look on your serving platter!
Step 7: Serve It Up
Finally, transfer your finished cheese ball to a lovely serving platter. Present it with an array of crackers, pretzels, or fresh raw vegetables. The vibrant colors and textures will catch everyone’s eye. Get ready for compliments as your guests dive into this tasty creation!
Tips for Success
- Always use softened cream cheese for easy mixing.
- If time allows, chill the cheese ball overnight for even better flavor integration.
- Experiment with different nuts for coating, like walnuts or almonds, for a unique twist.
- Consider adding a pinch of cayenne pepper for a spicy kick!
- Use fresh herbs whenever possible for the best flavor.
Equipment Needed
- Mixing Bowl: A large bowl for combining ingredients. A sturdy glass or ceramic bowl works great!
- Hand Mixer or Spatula: For mixing the cheese base. If you don’t have a mixer, a good old-fashioned spatula will do!
- Plastic Wrap: Essential for shaping and chilling your cheese ball.
- Shallow Dish: For mixing the coating ingredients. A pie plate or casserole dish is perfect!
- Serving Platter: To showcase your beautiful cheese ball. Get creative with presentation!
Variations of Pickle Fix Holiday Cheese Ball
- Spicy Kick: Add chopped jalapeños or a dash of hot sauce to the mix for a fiery twist.
- Herbaceous Delight: Incorporate other fresh herbs like basil or thyme to enhance the flavor profile.
- Smoky Flavor: Add smoked paprika or crumble in some bacon for a smoky touch that surprises the palate.
- Nut-Free Option: Omit the pecans and try sunflower seeds or simply leave it bare for those with nut allergies.
- Vegan Version: Substitute cream cheese and sour cream with vegan alternatives and make sure to use a dairy-free cheese instead.
Serving Suggestions for Pickle Fix Holiday Cheese Ball
- Pair with an assortment of crunchy crackers for a delightful contrast in texture.
- Serve alongside pretzels to add a salty crunch.
- Offer fresh vegetable sticks like carrots, celery, and bell peppers for a healthy option.
- Complement with a light white wine or refreshing sparkling water for a festive drink.
- Add colorful garnishes like cherry tomatoes or lemon wedges for a vibrant presentation!
FAQs about Pickle Fix Holiday Cheese Ball
When it comes to the Pickle Fix Holiday Cheese Ball, I’ve noticed some questions pop up quite frequently. Here are a few of the most common inquiries I’ve encountered, along with helpful answers to guide you through your cheese ball journey!
Can I make the Pickle Fix Holiday Cheese Ball ahead of time?
Absolutely! This cheese ball can be prepared up to 24 hours in advance. Just store it in the refrigerator wrapped tightly in plastic wrap. This allows the flavors to deepen, making it even more delicious!
What can I serve with the Pickle Fix Holiday Cheese Ball?
I recommend offering a variety of dippers. Try crackers, pretzels, and fresh veggie sticks. For a festive touch, include colorful garnishes like cherry tomatoes or lemon wedges. Your guests will love the options!
Can I use different cheeses in the recipe?
Of course! While sharp cheddar is fantastic, feel free to experiment with other cheeses. Creamy goat cheese or tangy feta could add exciting new flavors. Just remember to adjust the texture as needed!
How long will the cheese ball last in the fridge?
The Pickle Fix Holiday Cheese Ball should stay fresh for about 3–5 days in the refrigerator. Just make sure it’s well-wrapped to preserve its flavor and texture.
Can I make a vegan version of this cheese ball?
Yes, you can! Swap out the cream cheese and sour cream for vegan alternatives. Use dairy-free cheese and make sure all your ingredients align with a plant-based diet. Your vegan friends will certainly appreciate it!
Final Thoughts
As I reflect on the joy this Pickle Fix Holiday Cheese Ball brings to any gathering, I can’t help but feel a warm glow in my heart. It’s more than just an appetizer; it’s about shared moments, laughter, and the delight of creativity in the kitchen. Each bite transports you to a cozy holiday celebration, reminding us of the power of good food to connect us. This recipe not only delights the taste buds but also simplifies your life during the bustling holiday season. I hope you cherish making this cheese ball as much as I do, and may your gatherings be filled with love and happiness!
Print
Pickle Fix Holiday Cheese Ball
- Total Time: 1 hour 15 minutes
- Yield: 1 cheese ball 1x
- Diet: Vegetarian
Description
A festive and delicious cheese ball infused with dill pickles, perfect for holiday gatherings.
Ingredients
- 16 oz cream cheese, softened
- 2 cups sharp cheddar cheese, shredded
- 1/2 cup sour cream
- 3/4 cup dill pickles, finely chopped
- 1/4 cup green onions, finely sliced
- 2 tablespoons fresh dill, chopped
- 1 tablespoon Worcestershire sauce
- 1 teaspoon garlic powder
- 1/2 teaspoon onion powder
- 1/4 teaspoon freshly ground black pepper
- 1/2 cup pecans, finely chopped
- 1/4 cup fresh parsley, chopped
- 2 tablespoons dill pickles, finely chopped
Instructions
- Combine the softened cream cheese, shredded sharp cheddar, and sour cream in a large mixing bowl. Beat until smooth and creamy using a hand mixer or sturdy spatula.
- Gently fold in the finely chopped dill pickles, green onions, fresh dill, Worcestershire sauce, garlic powder, onion powder, and black pepper. Ensure the mixture is evenly blended.
- Transfer the blended mixture onto a large sheet of plastic wrap. Use the wrap to shape the mixture into a compact ball.
- Refrigerate the wrapped cheese ball for a minimum of 1 hour, or up to 24 hours, to allow the mixture to firm up.
- In a shallow dish, mix together the chopped pecans, fresh parsley, and additional chopped dill pickles for the exterior coating.
- Remove the chilled cheese ball from the plastic wrap. Roll it in the prepared coating mixture, pressing gently to ensure an even layer on all sides.
- Transfer the finished cheese ball to a serving platter and present it with crackers, pretzels, or raw vegetables.
Notes
- For a spicier version, add some chopped jalapeños.
- This cheese ball can be made ahead of time and stored in the refrigerator until ready to serve.
- Serve with a variety of dippers for a more festive presentation.
- Prep Time: 15 minutes
- Cook Time: 0 minutes
- Category: Appetizer
- Method: Mixing and Chilling
- Cuisine: American
Nutrition
- Serving Size: 1 oz
- Calories: 100
- Sugar: 1 g
- Sodium: 150 mg
- Fat: 8 g
- Saturated Fat: 4 g
- Unsaturated Fat: 3 g
- Trans Fat: 0 g
- Carbohydrates: 3 g
- Fiber: 0 g
- Protein: 4 g
- Cholesterol: 30 mg
Keywords: Holiday Cheese Ball, Festive Appetizer, Cheese Ball Recipe