

Introduction to Chocolate Caramel Waffle Cones
There’s something simply magical about Chocolate Caramel Waffle Cones that makes my heart skip a beat. I remember the first time my kids and I whipped these up; their eyes lit up like fireworks! This recipe is a perfect blend of crispy, creamy, and sweet—a delightful treat that the whole family will adore.
Whether you’re looking to impress guests or satisfy a late-night craving, these waffle cones hit the spot. Trust me, with just a handful of steps, you’ll create a dessert that’s not only delicious but also fun to make together!
Why You’ll Love This Chocolate Caramel Waffle Cones
Chocolate Caramel Waffle Cones are not just a dessert; they’re an experience! They’re easy to whip up, taking only around 40 minutes from start to finish. Plus, who can resist that perfect crunch of a homemade waffle cone filled with creamy caramel? Whether you’re a busy mom or a working professional, this treat elevates any moment without demanding too much time. Satisfying cravings while creating cherished memories? Yes, please!

Ingredients for Chocolate Caramel Waffle Cones
Gathering the right ingredients sets the stage for our adventure with Chocolate Caramel Waffle Cones. Each component plays a vital role, creating flavors that dance on your palate. Here’s what you’ll need!
- Unsalted butter: Essential for both the waffle cones and the creamy filling, bringing richness to the dessert.
- White granulated sugar: This sweetener not only adds sweetness but also helps create that lovely crisp in the cones.
- Whole milk: It lends creaminess to the batter, ensuring a soft yet sturdy waffle cone.
- Large eggs: They act as a binding agent, giving our cones structure and a delightful texture.
- Vanilla extract: A splash of this fragrant extract infuses warmth and depth to both the batter and the filling.
- Sea salt: Just a pinch enhances sweetness, making those flavors pop and rounding out the taste.
- All-purpose flour: This is the backbone of our cones, providing the necessary foundation for texture.
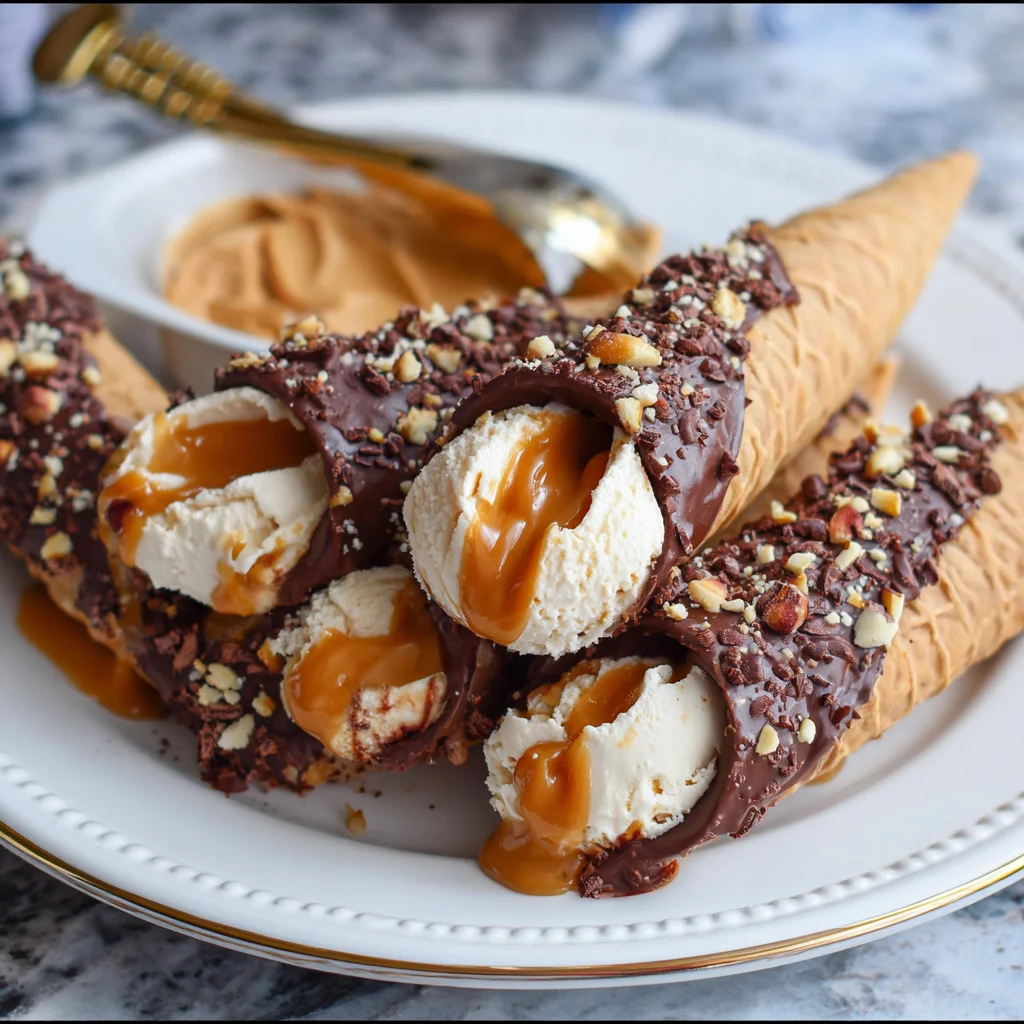
- Chocolate melts: These are for dipping the cones, creating a luscious chocolate coating that enhances the treat.
- Finely diced nuts (optional): For those who enjoy a bit of crunch, adding nuts on top of the chocolate is a delightful choice.
- Dulce de leche: This rich caramel-like spread serves as the star filling, creamy and sweet.
- Powdered sugar: It helps sweeten the filling while adding a smooth texture, making it absolutely dreamy.
For exact measurements, check the bottom of the article, where everything is conveniently listed for your printing pleasure. Happy cooking!
How to Make Chocolate Caramel Waffle Cones
Creating these Chocolate Caramel Waffle Cones is a delightful process that will have your kitchen buzzing with excitement. Follow these simple steps and watch your treats come to life!
Step 1: Melt the Butter
Prepare to create a delicious base by melting unsalted butter in a medium saucepan over medium heat. The buttery aroma is just heavenly!
Step 2: Combine Sugar and Milk
Add white granulated sugar and whole milk, stirring until the sugar dissolves completely. Once it’s smooth, remove from heat and allow to cool. This mixture ensures our cones have that lovely sweetness.
Step 3: Whisk It Up
Once the mixture has cooled, whisk in the large eggs, vanilla extract, and sea salt. Then, add all-purpose flour and mix until smooth. The batter should be thick yet pourable, perfect for shaping into cones.
Step 4: Preheat Waffle Cone Maker
Preheat your waffle cone maker and pour the batter onto the hot plates. One and a half tablespoons is just right! Watching the batter sizzle as it hits the hot iron is a joy!
Step 5: Cook and Shape the Waffle Cones
Cook the waffle until golden brown. Once ready, remove it and quickly roll into a cone shape while still hot; be careful, it can handle a bit of heat! This step really shapes our treat.
Step 6: Cool the Cones
Allow the cones to cool on a wire rack. This helps retain their crispiness, ensuring a delightful crunch later on.
Step 7: Prepare Chocolate Coating
Melt chocolate melts in the microwave until smooth. Dip the end of each cone into that glossy chocolate and set on parchment paper. This chocolate layer adds an irresistible allure!
Step 8: Add Toppings
Optional: sprinkle with finely diced nuts while the chocolate is still wet. This adds a lovely crunch and gorgeous finishing touch to each cone.
Step 9: Creamy Caramel Filling
In a large bowl, beat softened butter until fluffy. Add in dulce de leche, vanilla extract, and salt, beating until well mixed. The filling will be creamy and oh-so-decadent!
Step 10: Assemble the Cones
Add powdered sugar to the caramel mixture and beat until fluffy. Transfer the filling to a pastry bag for an easy way to fill the cones!
Step 11: Fill the Cones
Fill each waffle cone with the caramel filling from the bottom up. Watching the caramel overflow just enough is a treat in itself!
Step 12: Chill and Serve
Refrigerate the filled cones for about 20 minutes to let the filling set. Serve them immediately or store in a container for short-term enjoyment. Either way, they won’t last long!
Tips for Success
- Make sure your butter is softened correctly; it helps in beating for the creamy filling.
- If the waffle cones become too soft, re-crisp them by placing them back in the waffle maker for a minute.
- Don’t rush the cooling process; letting the cones cool fully keeps them crispy!
- Chill the filled cones for a bit to set the caramel and enhance the flavors.
- For easy clean-up, line your workspace with parchment paper when dipping in chocolate.
Equipment Needed
- Waffle cone maker: This is essential for crafting your cones. If you don’t have one, a traditional waffle iron will work in a pinch.
- Medium saucepan: For melting butter and mixing ingredients; any sturdy pot will do.
- Whisk: Perfect for blending the batter; you can also use a fork if needed.
- Pastry bag: Ideal for filling cones. You can use a zip-top bag with the corner snipped off as an alternative.
- Parchment paper: Keeps your workspace clean and is handy for cooling chocolate-dipped cones.
Variations
- Chocolate Variations: Try using dark or white chocolate melts for different flavor profiles. Each type brings its own unique taste.
- Nut-Free Option: Simply omit the nuts or use seeds like sunflower seeds for a safe alternative for those with allergies.
- Flavorful Fillings: Swap dulce de leche for flavored spreads like hazelnut chocolate or raspberry jam for a twist.
- Gluten-Free Option: Replace all-purpose flour with a gluten-free flour blend to cater to those avoiding gluten.
- Vegan Adaptation: Use dairy-free butter and a plant-based milk for a vegan-friendly version of these decadent cones.
Serving Suggestions
- Ice Cream Pairing: Serve with a scoop of your favorite ice cream for an indulgent treat that’s hard to resist.
- Fresh Berries: Add a side of fresh strawberries or raspberries for a vibrant and refreshing contrast.
- Presentation: Arrange cones in tall glasses to showcase their beauty while adding a fun touch to your table.
- Hot Beverages: Pair with coffee or hot chocolate for a cozy dessert experience.
- Chocolate Drizzle: Drizzle extra melted chocolate on top for a show-stopping presentation.
FAQs about Chocolate Caramel Waffle Cones
Can I make the waffle cones in advance? Absolutely! You can prepare the cones a day ahead. Just store them in an airtight container to keep them crispy until you’re ready to fill them.
How should I store the filled cones? Store your filled Chocolate Caramel Waffle Cones in a container in the refrigerator for up to three days. Just note that they may lose some crispiness over time.
What can I substitute for dulce de leche? If you’re not a fan of dulce de leche, try using caramel sauce or even peanut butter for a unique twist in your filling!
Can I use a different type of chocolate for dipping? Yes! You can experiment with dark, milk, or even white chocolate melts for dipping. Each will add a delightful flavor to your cones.
How do I stop the cone from becoming soggy after filling? Chill the filled cones for at least 20 minutes. This sets the filling and helps maintain the crunch of the waffle cone.
Final Thoughts
Creating Chocolate Caramel Waffle Cones is truly a celebration of flavors and memories. The joy on my kids’ faces as they indulge in these sweet treats always warms my heart. With each crispy bite, the rich caramel filling and smooth chocolate offer a delightful experience that’s hard to replicate.
This recipe invites you into the kitchen for a bit of fun with your loved ones. Whether served at a party or enjoyed as a cozy night treat, these cones sprinkle a little magic into everyday moments. Give it a try, and watch how they disappear in no time!
Print
Chocolate Caramel Waffle Cones
- Total Time: 40 minutes
- Yield: 12 cones 1x
- Diet: Vegetarian
Description
Chocolate Caramel Waffle Cones are a delightful treat filled with creamy caramel and surrounded by crispy waffle cones, dipped in chocolate and optionally topped with nuts.
Ingredients
- 1/2 cup unsalted butter (for waffle cones)
- 1 cup white granulated sugar
- 1 1/3 cups whole milk
- 2 large eggs
- 1 tsp vanilla extract
- 1/4 tsp sea salt
- 2 cups all-purpose flour
- 8 oz chocolate melts (for dipping)
- 1 cup finely diced nuts (optional)
- 1 cup unsalted butter (for filling)
- 13 oz dulce de leche
- 1 tsp vanilla extract (for filling)
- 1/4 tsp sea salt (for filling)
- 1 cup powdered sugar
Instructions
- In a medium saucepan, melt the butter over medium heat.
- Add granulated sugar and milk, stirring until the sugar dissolves, then remove from heat and let cool.
- Once cooled, whisk in eggs, vanilla extract, and sea salt. Then, add flour and whisk until smooth.
- Preheat the waffle cone maker and pour 1 ½ tablespoons of batter onto the hot plates.
- Cook the waffle until golden, then remove and roll into a cone shape while still hot.
- Cool the cones on a wire rack.
- Melt chocolate melts in the microwave until smooth, then dip the end of each cone and set on parchment paper.
- Optional: sprinkle with chopped nuts while the chocolate is still wet.
- In a large bowl, beat softened butter until fluffy, then add dulce de leche, vanilla extract, and salt.
- Add powdered sugar and beat until fluffy. Transfer to a pastry bag.
- Fill each cone from the bottom up with the caramel filling.
- Refrigerate filled cones for about 20 minutes to set the filling.
- Serve immediately or store in a container in the refrigerator for up to 3 days.
Notes
- For softer filling, refrigerate before using.
- Enjoy immediately or keep at room temperature for a few hours.
- Refrigerated cones may become soft and lose crispiness.
- Prep Time: 30 minutes
- Cook Time: 10 minutes
- Category: Dessert
- Method: Baking
- Cuisine: American
Nutrition
- Serving Size: 1 cone
- Calories: 250
- Sugar: 18g
- Sodium: 150mg
- Fat: 15g
- Saturated Fat: 8g
- Unsaturated Fat: 6g
- Trans Fat: 0g
- Carbohydrates: 30g
- Fiber: 1g
- Protein: 2g
- Cholesterol: 40mg
Keywords: Chocolate Caramel Waffle Cones, dessert, sweets, chocolate, caramel