
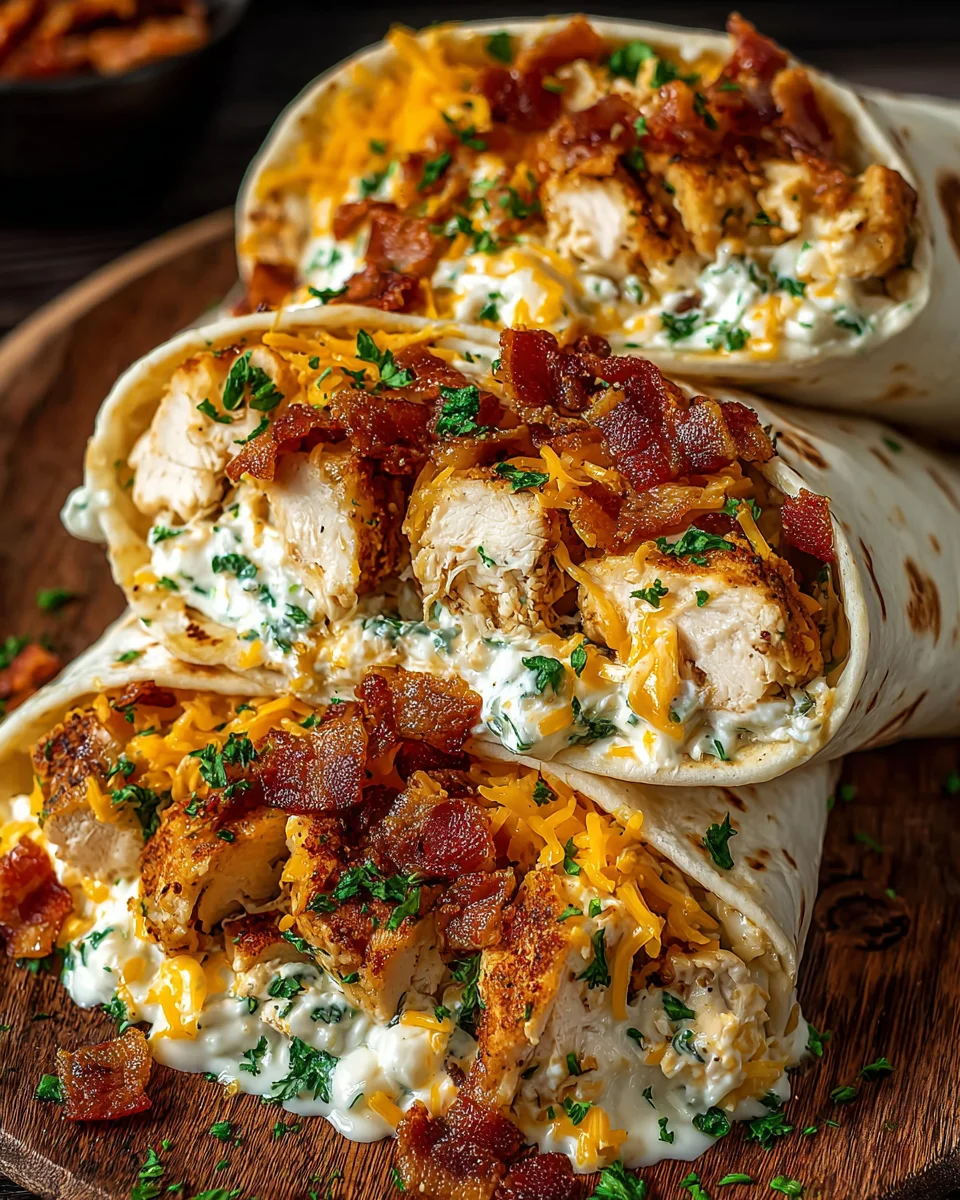
Introduction to Crunchy Bacon Chicken
As a busy mom, I understand the struggle of juggling work and family while trying to whip up something delicious. That’s why I’m thrilled to share my recipe for Crunchy Bacon Chicken! This scrumptious wrap brims with crispy bacon, tender chicken, and a creamy cheese sauce that will delight everyone at the table.
If you’re looking for a quick solution for a hectic day or a dish that will leave your loved ones raving, you’ve found it. Trust me, this wrap not only satisfies the taste buds, but it’s also easy to prepare. Let’s dive in!
Why You’ll Love This Crunchy Bacon Chicken
This Crunchy Bacon Chicken wrap is the ultimate solution for busy nights. It’s quick to make, taking only about 30 minutes from start to finish. The blend of crispy bacon and flavorful chicken wrapped in a creamy, cheesy goodness is a guaranteed crowd-pleaser. Plus, it’s customizable! Whether your family loves a little heat or prefers it mild, you can easily adapt the flavors to suit everyone’s taste.
Ingredients for Crunchy Bacon Chicken
Gathering the right ingredients is the first step to crafting your Crunchy Bacon Chicken wraps. Here’s what you’ll need to whip up this delightful dish:
- Cooked bacon pieces: The star of the show! Crispy bacon adds that wonderful crunch and savory flavor.
- Plain flour: This is essential for thickening your creamy cheese sauce. It’s the glue that holds it all together.
- Butter: Melted butter gives the sauce a rich taste and contributes to that lovely smooth texture.
- Garlic: Finely chopped garlic brings a depth of flavor to the mix. Who can resist the smell of sautéing garlic?
- Rich cream: Heavy cream makes your cheese sauce luxurious and decadent. If you prefer a lighter option, half-and-half works too.
- Milk: Adding milk helps achieve the perfect consistency in the sauce. You can go for whole milk or your favorite milk alternative.
- Shredded chicken: Use cooked chicken for ease. It can be leftover rotisserie chicken or even canned chicken in a pinch!
- Ranch sauce: This dressing adds a tangy zip. Feel free to swap it out for your favorite dressing if ranch isn’t your go-to.
- Grated cheddar: Sharp cheddar cheese enhances the flavor profile, making it all the more enjoyable.
- Seasonings: Salt, pepper, and parsley are the perfect way to elevate the taste. Customize to your heart’s desire!
- Green onions: Diced green onions add a fresh note and a bit of crunch to the wraps.
- Flour wraps: These make everything possible! They cradle all that delicious filling. Pot for whole wheat wraps for a healthier take.
For exact measurements, just scroll down to the end of the article where you’ll find a printable version of this recipe. Let’s get ready to cook!
How to Make Crunchy Bacon Chicken
Step 1 – Prepare the Cheesy Mixture
First things first, let’s create that creamy base that makes our Crunchy Bacon Chicken so irresistible! Start by warming the melted butter in a medium-sized pan over medium heat. Once it’s hot, toss in the finely chopped garlic and sauté it for about a minute. You want that delicious aroma to fill your kitchen!
Next, sprinkle in the plain flour. Cook it while stirring for another minute; this helps to get rid of that raw flour taste. Now, slowly pour in the milk and heavy cream, whisking continuously. Keep stirring for about 3-4 minutes until the sauce thickens to a nice creamy consistency. Finally, add in the cheddar cheese, bacon pieces, ranch sauce, parsley, pepper, and salt. Mix it all until smooth and cheesy. Your mouth might just water at this point!
Step 2 – Combine the Chicken and Sauce
Now, it’s time to bring the star ingredient into the spotlight—the chicken! Chop or shred your pre-cooked chicken into bite-sized pieces, if needed. Gently fold this chicken into your cheesy mixture, ensuring every single piece is coated with that velvety goodness.
Keep mixing until the chicken is fully integrated and everything is luscious and creamy. Give it a taste and adjust the seasoning if necessary. Take a moment to appreciate how this delightful blend promises to transform the wraps. Trust me, you’ll want to eat it straight from the bowl!

Step 3 – Assemble the Wraps
Time to get rolling! Lay out the large flour wraps on a clean surface; this is where all the magic happens. Take a generous spoonful of the chicken and cheesy mixture and place it right in the center of each wrap. You don’t want to overfill, or it could get messy—no one needs a sauce explosion in their kitchen!
Now, fold the opposite edges over the filling, then roll from the bottom to the top, making sure it’s snug. You want these wraps to hold their shape, as they’ll be grilled later. Isn’t the anticipation of the first bite just thrilling? Set them aside; we’re almost there!
Step 4 – Cook the Wraps
Grab a nonstick skillet and warm it over medium heat—this is where we’ll achieve that crunchy, golden exterior. Once hot, place the wraps seam-side down in the pan. Sizzle them for about 2-3 minutes per side until they’re beautifully browned and crisp. You’ll love letting them cook, as the smell wafts around your kitchen!
Flip carefully to avoid tearing the wraps. Once both sides are golden brown, take them off the heat. Slice them in half, and there you have it—delicious, warm Crunchy Bacon Chicken wraps ready to be devoured! Serve them with extra ranch for dipping; trust me, you’ll thank me later!
Tips for Success
- Don’t rush the cheese sauce; let it thicken for the best texture.
- For extra crunch, crisp the bacon just before adding it to the mix.
- Feel free to customize the veggies—bell peppers or spinach make great additions!
- Roll the wraps tightly for less spillage while cooking.
- Keep a close eye while cooking to avoid burning.
Equipment Needed
- Medium-sized pan: A nonstick skillet works wonders for cooking the cheese mixture.
- Whisk: Essential for mixing the sauce smoothly; a fork will do in a pinch.
- Sharp knife: Perfect for slicing the wraps after cooking.
- Cutting board: Use this for assembling your wraps comfortably.
- Spatula: Ideal for flipping the wraps without tearing them apart.
Variations
- Spicy Twist: Add diced jalapeños or a dash of hot sauce to the cheesy mixture for an extra kick!
- Vegetarian Option: Replace chicken with black beans or roasted vegetables for a delightful meat-free meal.
- Red Pepper Feta: Swap ranch dressing for a tangy feta dressing and add roasted red peppers for a Mediterranean twist.
- Herb Infusion: Mix in fresh herbs like basil or cilantro to elevate the flavor profile in the cheesy sauce.
- Low-Carb Version: Use lettuce leaves instead of flour wraps for a lighter, low-carb alternative!
Serving Suggestions
- Pair with a fresh garden salad for a refreshing crunch.
- Serve alongside sweet potato fries for a satisfying combination.
- Offer a side of creamy coleslaw to complement the savory wraps.
- For drinks, try iced tea or a tangy lemonade to balance the richness.
- Garnish with cilantro or parsley for a pop of color and freshness.
FAQs about Crunchy Bacon Chicken
Can I use turkey bacon instead of regular bacon?
Absolutely! Turkey bacon gives a lighter version of the Crunchy Bacon Chicken wrap while still adding that delicious crunch. Just make sure to crisp it up nicely before mixing it in!
How can I make this dish gluten-free?
To make your Crunchy Bacon Chicken gluten-free, simply use a gluten-free all-purpose flour blend. You can also swap the flour wraps for gluten-free tortillas. Easy peasy!
Can I pre-make these wraps for later?
Yes! You can assemble the wraps and store them in the fridge for a day or two. Just warm them up in a skillet when you’re ready to enjoy. This is a great meal prep idea!
What if I have leftovers?
If you have extra filling, store it in an airtight container in the fridge. It should last a few days! You can reheat it in a pan or microwave for a quick snack.
Can I freeze the wraps?
Yes! Wrap them tightly in plastic wrap or foil before placing them in a freezer-safe bag. Thaw overnight in the fridge and reheat for a tasty meal later on.
Final Thoughts
Creating these Crunchy Bacon Chicken wraps is more than just cooking; it’s a joyful experience that brings everyone together. From the moment the sweet aroma fills your home to that first, satisfying bite, you’ll feel the love that went into each wrap. It’s a dish that ignites laughter and conversation around the dinner table, making busy nights a little brighter. With simple ingredients and straightforward steps, you can whip these up effortlessly. So go ahead, treat your family to this delightful wrap and relish those happy moments shared over a delicious meal!
Print
Crunchy Bacon Chicken
- Total Time: 30 minutes
- Yield: 4 wraps 1x
- Diet: Low Calorie
Description
A delicious and crunchy wrap filled with bacon, chicken, and creamy cheese sauce.
Ingredients
- 1 cup cooked bacon pieces
- 1/4 cup plain flour
- 1/4 cup butter, melted
- 2 finely chopped garlic cloves
- 1/2 cup rich cream
- 1 cup milk
- 1 cup shredded chicken, cooked
- 1/2 cup ranch sauce
- 1 cup grated cheddar
- Salt, parsley, and pepper for seasoning
- 2 green onions, diced
- 4 large-sized flour wraps
Instructions
- Warm butter in a pan over medium heat. Toss in the minced garlic and stir for a minute. Sprinkle in the flour and cook while stirring for another minute.
- Slowly add milk and heavy cream while whisking. Keep stirring for 3-4 minutes until it thickens. Toss in cheddar cheese, ranch dressing, bacon bits, parsley, pepper, green onions, and salt. Blend until smooth.
- Mix the cooked shredded chicken into the cheesy blend. Stir everything until the chicken’s evenly coated.
- Place a generous spoonful of the chicken and sauce mix in the middle of each tortilla. Fold the edges over, then roll them up tightly.
- Warm up a nonstick skillet over medium heat. Lay the wraps seam-side down in the pan and cook until golden on both sides, about 2-3 minutes per side.
- Slice the wraps in half and enjoy them warm. Serve with some extra ranch on the side for dipping.
Notes
- Adjust seasoning to taste.
- Can substitute ranch sauce with your favorite dressing.
- Leftover filling can be stored in the refrigerator for a few days.
- Prep Time: 15 minutes
- Cook Time: 15 minutes
- Category: Main Dish
- Method: Stovetop
- Cuisine: American
Nutrition
- Serving Size: 1 wrap
- Calories: 450
- Sugar: 2g
- Sodium: 900mg
- Fat: 25g
- Saturated Fat: 10g
- Unsaturated Fat: 15g
- Trans Fat: 0g
- Carbohydrates: 30g
- Fiber: 2g
- Protein: 25g
- Cholesterol: 75mg
Keywords: Crunchy Bacon Chicken, Wrap Recipe, Chicken Wrap